HOLE BY HOLE
Mens Ratings
| Tee | Slope | Rating |
| Blue | 131 | 71.9 |
| White | 125 | 70.5 |
| Red | 112 | 65.9 |
Ladies Ratings
| Tee | Slope | Rating |
| White | 133 | 75.9 |
| Red | 113 | 71.5 |
Front 9
HOLE 1
Par 4
Handicap 6
A short, dogleg par 4 protected by trees on the right and a canal on the left. The smart play is your 200-yard club to the turn with a medium iron approach. Risk takers can cut the corner, but anything hit right is trouble.
| White | 373 yds |
| Blue | 314 yds |
| Red | 171 yds |
HOLE 2
Par 4
Handicap 4
The easiest par 4 on the course. Grip and rip a driver and you will have a short iron approach to a very receptive green. The only danger on this hole is OB on the far left.
| White | 414 yds |
| Blue | 352 yds |
| Red | 231 yds |
HOLE 3
Par 4
Handicap 10
The longest hole on the course. Two good shots get you to a medium to short iron into an elevated green. Missing right on this hole is best, as Georgina’s field gobbles up anything that passes her way on the left.
| White | 356 yds |
| Blue | 295 yds |
| Red | 160 yds |
HOLE 4
Par 4
Handicap 12
Another straightaway par 4 with OB all along the left. A deceptive bunker lies in wait at the 150 yard markers in the middle of the fairway, so try to avoid it. Anything from a medium to short iron approach can yield a good score on this one.
| White | 348 yds |
| Blue | 273 yds |
| Red | 184 yds |
HOLE 5
Par 4
Handicap 14
Risk/reward short par 4. Longer hitters may try to drive the green, but several deep and strategically placed pot bunkers loom dangerously. A medium iron lay-up off the tee leaves a short iron approach to a deceptively tricky green. Birdie to bogey are possibilities.
| White | 276 yds |
| Blue | 266 yds |
| Red | 142 yds |
HOLE 6
Par 3
Handicap 18
The first par 3. Surrounded by water and sand on three sides, it has the look of an island green. Depending on the wind, this hole can go from a medium iron to a wedge. Playing to the middle of the green is safest, but beware, the green slopes sharply from back to front.
| White | 130 yds |
| Blue | 115 yds |
| Red | 110 yds |
HOLE 7
Par 5
Handicap 2
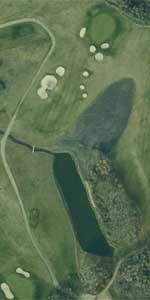
This 533 yard par 5 is a definite risk/reward hole. Keep your driver in the bag as the two ponds and their connection is in reach. Reachable in two for the longer hitters if the first shot is strategically placed along the right side of the fairway. Beware of the right side on the approach shot as water and hills consume any balls lost to the right.
| White | 481 yds |
| Blue | 466 yds |
| Red | 332 yds |
HOLE 8
Par 3
Handicap 16
A great par 3. Water and reeds guard the front of this sloped green. Missing far right leads to tree trouble. Club choice is again crucial to avoid a big number.
| White | 155 yds |
| Blue | 134 yds |
| Red | 88 yds |
HOLE 9
Par 4
Handicap 8
Aim your tee shot at the clubhouse. Too far right and you will be in big tree trouble; too far left and you will face a big bunker with a high lip. A 220-yard drive leaves you a medium iron approach to a pear-shaped green. Beware of a back pin, as the landing area is tiny.
| White | 371 yds |
| Blue | 341 yds |
| Red | 223 yds |
Back 9

HOLE 10
Par 4
Handicap 7
This starting hole on the back nine is where ball placement begins to become a necessity. Laying up to the right side of the fairway will leave you with the safest approach shot to the green. Longer hitters can test their luck by attempting to pass the three trees directly in line with the green, but beware of a back left pin or the unlucky outcome of a blocked view of the green. Out of bounds runs the length of the right side for the entire hole.
| White | 353 yds |
| Blue | 313 yds |
| Red | 200 yds |
HOLE 11
Par 4
Handicap 13
An easterly wind makes this the most difficult par 4. Trees left and OB right can intimidate some. A good drive can leave you a long iron or more into a two-tiered, heavily sloped green. Par here is a great score, take it and run.
| White | 352 yds |
| Blue | 299 yds |
| Red | 196 yds |
HOLE 12
Par 5
Handicap 1
A short dogleg par 4 with all the trouble right. The smart play is a shot to the corner and a medium iron approach. Beware, the green is the most severely sloped on the course. Being below the hole is crucial to guarantee an easier putt.
| White | 558 yds |
| Blue | 467 yds |
| Red | 310 yds |
HOLE 13
Par 4
Handicap 9
Tricky par 4. The smart play is to play left of the left big spruce trees, but this leaves a very long approach shot to a creek-guarded green. If you take a chance and play to the center or the right, the trees and a long waste bunker on the right can come into play. Choose wisely.
| White | 355 yds |
| Blue | 312 yds |
| Red | 181 yds |
HOLE 14
Par 4
Handicap 11
This short par 4 can be played in several ways. The safest route is to hit a 130-yard shot to the corner leaving a 150 yard approach to a bunker guarded green. The alternative is to hit a long iron or wood, cutting the trees at a direct line to the hole. Successful attempts will leave you a short wedge into the green, but unsuccessful attempts will have you hitting 3 from the tee box and contemplating your shot choice. Out of bounds long off the tee shot on the right side complicate the choice.
| White | 293 yds |
| Blue | 205 yds |
| Red | 200 yds |
HOLE 15
Par 3
Handicap 17
Shortest par 3 on the course. Firing a short iron out of a chute of trees seems easy, but a deep bunker protects short left, trees await balls right and short, and going long means coming back up a big slope to a green that slopes away from you. Enjoy!
| White | 135 yds |
| Blue | 109 yds |
| Red | 100 yds |
HOLE 16
Par 5
Handicap 3
A definite shot-makers hole, the safest route is to play the ball to the corner, followed by a lay-up. Club choice must be made wisely on approach shot as elevation comes briefly into affect. The home stretch of the course is where strokes can be made or lost. In desperation, a driver can be hit off the tee to cut the trees. Picking the right line and following it up with a well struck drive will leave you with a long to mid iron into the green.
| White | 533 yds |
| Blue | 429 yds |
| Red | 373 yds |
HOLE 17
Par 3
Handicap 15
Arguably the hardest par 3 on the course, club selection is key because distances are often deceiving. Hitting the ball long brings water and trees into play. Hitting the ball off target will most likely leave you a difficult bunker shot with not much green to work with. A back right pin placement can make for an extremely difficult tee shot, the best play is to aim for the middle of this uphill green.
| White | 160 yds |
| Blue | 115 yds |
| Red | 63 yds |
HOLE 18
Par 5
Handicap 5
A great finishing hole. The tee shot is very demanding with trees right and water hazard left. A definite test of a golfer’s composure. A well-struck drive can result in an eagle or birdie chance, but a poorly struck drive will bring high numbers into play. This is an excellent hole to bring excitement to any close match.
| White | 475 yds |
| White | 406 yds |
| Red | 291 yds |
1505 – 2nd Street
Wainwright, AB
T9W 1L5
ABOUT US
Located along Highway 14 in Wainwright, Alberta, this public 18-hole, 6,400 yard golf course awaits golfers of all skill levels. Amenities include:
- Practice facility
- 4 sets of tees
- Clubhouse with parge patio
- 26 fully serviced RV stalls
- Pro shop and lessons